
Baked Cheesy Italian Sliders Recipe
This post may contain affiliate links. If you click and purchase, we may earn a small commission. Read our full disclosure.
Why you’ll love this recipe
- These easy Italian sliders are the perfect party appetizer.
- A great way to pack school lunches with individual sandwiches.
- Easily assembled with minimal ingredients and quick clean up.
- All types of meat are delicious on these mini sandwiches.
If you’re looking for an easy appetizer that’s perfect for sharing and absolutely delicious, you’ve stumbled to the right place. Usually, I’m a fan of something like buffalo tuna dip or air fryer egg rolls. This time, I switched it up for you guys and went the sliders route.
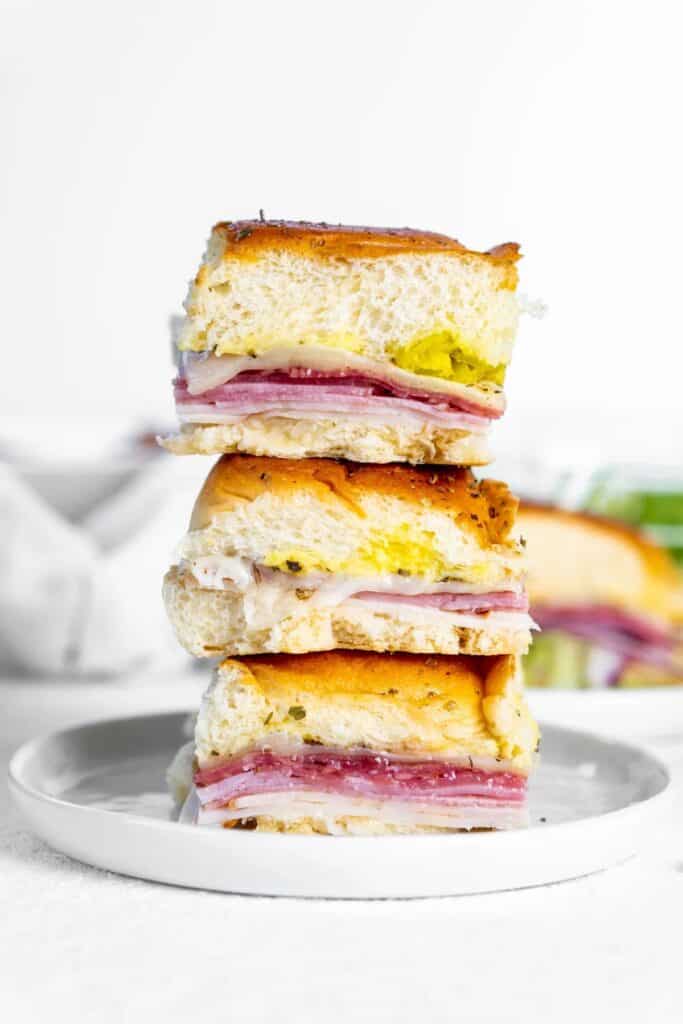
Soft Hawaiian rolls are filled with pieces of salami, ham, chicken and capicola, all topped with melty cheese. There is so much flavor in these hot Italian sliders, you will never need another sandwich again!
If I’m bringing these to a party, I like to make 2 or 3 variations so people have options. Serve these alongside chicken bacon ranch sliders, chicken pesto sliders, buffalo chicken sliders or honey mustard chicken wraps do there’s something for everyone!
No rolls? No worries.
I made my baked cheesy Italian sliders with King’s Hawaiian Sweet Rolls because they are the BOMB and get the perfect golden brown crust when baked. However, if you don’t want these or can’t find them at your grocery store, you can use any mini bread roll you can find. I promise, it will be just as good!
Can you make this ahead of time?
I definitely suggest you make these slider rolls at the time you’re ready to eat them. They’re delicious when hot and gooey straight out of the oven. But, I know from experience they are still delicious the next day when eaten cold. If you plan to make ahead of time, leave the lettuce and onions off until you’re ready to eat them.
Can you make this recipe gluten and dairy free?
Yes, very easily. To make the Italian Sliders gluten free use your favorite gluten free rolls or even Canyon Bakehouse Hawaiian Rolls! Cut them into 12 equal squares. To make this dairy free omit cheese entirely or use a dairy free option like Violife Smoked Provolone.

Ingredients and Substitutes:
These are the main ingredients and substitutions. See recipe card below for full ingredients list and instructions for Baked Cheesy Italian Sliders Recipe.
Hawaiian Sweet Rolls: this recipe uses a 12 pack of King’s Hawaiian Sweet Rolls. If you cannot find these you can swap for brioche buns, buttery rolls or any slider buns.
Deli Meat: for this recipe I am using deli chicken, deli ham, capicola and genoa salami. Below is a list of exact brands I used with links. You can swap with your favorite.
- Dietz & Watson Southern Fried Chicken Breast
- Dietz & Watson Ham Maple Smoked
- Primo Taglio Capocolla Hot Sliced
- Primo Taglio Salami Genoa
Provolone Cheese: to reduce the fat you can use reduced fat cheese but I personally do not think it melts well. Swap with other cheeses like mozzarella or swiss.
Red Wine Vinegar: I would not skip this part, this is the secret ingredient. You can add more if you’d like for a extra juicy bun.
Italian Seasoning: use pre made seasoning or make your own.
Pepperoncini Juice: I would not skip. The juice of mild banana peppers do NOT add a lot of spice to the Italian subs so no need to worry about that. If you want a little kick of heat: add 1Tbsp, jalapeño juice.

How to make these Italian sliders:
Step 1
Pre heat oven to 375 degrees Fahrenheit. Spray a 9×13 inch (or any dish large enough to fit all rolls) baking sheet with nonstick spray and set aside.
Step 2
Slice your sweet Hawaiian Rolls through the center so you have a top and bottom leaving all 12 connected.
Step 3
Top the bottom rolls evenly with sliced chicken, ham, capicola, salami and cheese. Using 5 slices of cheese, cut the 5th in half to go along the center of the rolls evenly so that everything is covered with cheese.
Step 4
Sprinkle 1 tsp. Italian Seasoning over the cheese.
Step 5
Evenly drizzle 2 Tbsp. of red wine vinegar on the underside of the top half of the buns. The cut side, not the top of the roll. Drizzle with pepperoncini juice and place on top of the cheese covered bottom half. Option: add pepperoncini’s on top of the cheese before baking. This is one of my favorite things to add, not including in the nutrition facts.
Step 6
Place the rolls in the baking or casserole dish and CUT all 12 into individual rolls. Do this so that it’s easy to pull apart since the meat overlaps and will need to be cut. Spray the top of the buns with cooking spray or melt butter and brush it over the tops. Sprinkle with additional Italian Seasoning.
Step 7
Loosely cover the rolls with foil and bake for 15 minutes. Remove the foil and let bake for an additional 5 minutes to crisp the top of the Italian Sliders up some.
Step 8
Remove from the oven when the cheese has fully melted and serve. Top with shredded lettuce, thinly sliced red onion and pepperoncini’s.

What to serve with these sliders
Serve with toppings like pepperoncini’s, jalapeños, shredded iceberg lettuce and thinly sliced red onion. If you want to add a dipping sauce, dip into heated marinara sauce for a little extra flavor. These Italian Sliders are the perfect appetizer next to buffalo Italian chicken meatballs for a game day meal everyone will devour.

Check out some of our other easy meals!
- Blackened Chicken Tacos
- Blackened Chicken White Sauce Pizza
- Honey Mustard Chicken Wraps
- Sesame Ginger Chicken Pita
Italian Sliders
📱 MyFitnessPal & MacrosFirst App Users
You can find this recipe and many others on MyFitnessPal and MacrosFirst by searching: Ohsnapmacros – Italian Sliders
Ingredients
- 12 pack Original Hawaiian Sweet Rolls (King's Hawaiian)
- 2 slices deli chicken
- 4 slices deli ham
- 6 slices hot capicola
- 6 slices Genoa salami
- 5 slices provolone cheese
- 2 Tbsp. red wine vinegar
- 1-2 Tbsp. pepperoncini juice
- 1 tsp. Italian Seasoning + more for topping
Instructions
- Pre-heat oven to 375 degrees Fahrenheit. Spray a 9×13 inch (or dish large enough to fit all rolls) baking dish with nonstick spray and set aside.
- Slice Hawaiian Rolls through the center so you have a top and bottom leaving all 12 connected.
- Top the bottom rolls evenly with sliced chicken, ham, capicola, salami and cheese. Using 5 slices of cheese cut the 5th in half to go along the center of the rolls evenly so that everything is covered with cheese.
- Sprinkle 1 tsp. Italian Seasoning over the cheese.
- Evenly drizzle 2 Tbsp. of red wine vinegar on the underside of the top half of the buns. This cut side, not the top. Drizzle with pepperoncini juice and place on top of the cheese covered bottom buns. Option: add pepperoncini's on top of the cheese before baking. This is a delicious addition, not including in the nutrition facts.
- Place the rolls in the baking dish and CUT all 12 into individual rolls. Do this so that it's easy to pull apart since the meat overlaps and will need to be cut. Spray the top of the rolls with butter or cooking spray and sprinkle with additional Italian Seasoning.
- Loosely cover the rolls with foil and bake for 15 minutes. Remove the foil and let bake for an additional 5 minutes to crisp the rolls some.
- Remove from the oven when the cheese has fully melted and serve. Top with shredded lettuce, thinly sliced red onion and pepperoncini's.
Notes
- Nutritional information is an estimate and will vary with substitutions.
- Use any preferred meats and/or cheeses.
- Serve immediately!


I shouldn’t be surprised…Ohsnapmacros delivers every time. I made these for lunches so I added the lettuce mixture every morning and Omgosh, could not ask for a better lunch sandwich. Healthy, fresh, and FILLING. Favorite recipe so far!!
OMG!-these are freaking amazing! I read the reviews before making these for the first time. The reviews were spot on! These slides have quickly become a staple in my house. It makes for a quick weeknight meal, and heat up nicely for lunch. I send them in my daughter’s lunch cold and she enjoys them too! I have yet to put the lettuce and onion on – for me the pepperoncinis are perfect alone.
Delicious and easy to make, this has quickly become a family favorite!
These are so good and easy to make! A family favorite in my household. We make these for get togethers, work week lunches, or busy sports nights!
I’ve made a ton of Danielle’s recipes but this is THE ONE!! For the past two weeks I’ve eaten these everyday for lunch. I am absolutely obsessed. I even took them to work this week and everyone said they looked amazing! Like Danielle said, do not skimp out on the red wine vinegar or pepperoncini juice!!!
Yay!! Thank you!
AMAZING!!! Quick, easy & Delicious
Woohoo!!! Glad you loved them!
I made these for my husband’s recent fishing trip and he absolutely loved them! I did have a question though, what’s the best way to put red wine vinegar on these sliders? I put it on but it made the bread soggy. Any tips would be great!
I just drizzle it on with a spoon to cover each top some on the underside. You could also put it directly on top of the cheese or meat. If you think of a Italian sub they get that nice juicy bread from the oil and vinegar.